Friday 22 September 2017
Tuesday 15 November 2016
Microsoft Dynamics 365
1.
How does Dynamics 365 benefit customers?
Dynamics 365 will bring together the best
of our CRM and ERP cloud offerings into one cloud service with specific,
purpose built, apps for each of your key business processes such as Finance,
Sales, Customer Service, etc.
Dynamics 365 provides customers a modern
and familiar experience with built in insights, intelligence and
workflow. They also use a common data model and consistent application
platform to ensure consistency, interoperability and
extensibility. Dynamics 365 enables businesses to:
·
Start with what
they need by offering apps that fit roles,
industries, businesses, so our customers can start with what they need to grow
at their own pace and run their entire business in the cloud.
·
Enable greater
productivity where they need it by connecting structured workflow of
business applications and processes with the unstructured work of collaboration
and productivity, so employees are empowered with productivity tools surfaced
in the context of their business processes.
·
Get built-in intelligence
with business applications that infuses big data, advanced analytics and
IoT into processes out-of-the-box to proactively guide employees and customers
to optimal outcomes. With Dynamics 365, data and insights are transformed
into action for intelligence where it’s needed.
·
Be ready for
growth through nimble, adaptable applications that allow them to compose,
modify and extend processes in real-time. Business users are empowered to change
and adapt with a technological enabling platform. Organizations can reimagine their business
model with a consistent, flexible, extensible platform.
2.
Why did you choose the name Dynamics 365 and what does it
represent?
Dynamics
365 is our next generation of business apps in the cloud. These apps bring
together the full power of Microsoft across productivity, advanced analytics,
Power BI and IoT with the strength of Azure and a new application platform and
common data model. As such, the new name reflects the significance of the
offering and the coming together of two worlds: structured business processes and
unstructured personal productivity, so our business customers can achieve more.
3.
Is this just a marketing/repackaging exercise or are you offering a
new product?
Dynamics 365 is a net new proposition that
combines new products, new product capabilities, new packaging and new
pricing. We are taking a new approach to how we develop our products and
bring them to market.
4.
Do all these Dynamics 365 apps really work together seamlessly?
All of Microsoft’s intelligent business
apps will align to our new common data model, and an extensibility model that
combines existing customization tools with PowerApps and Flow. We have made
solid progress towards apps working seamlessly together, and it’s an effort
we’ll continue as we redefine business processes to eliminate historical
boundaries between CRM and ERP. Cortana Intelligence Suite, IoT and PowerBI all
play key roles in how we help businesses be more outcome driven as well
as give our customers and our Partner ecosystem the ability to leverage our new
common data platform to integrate legacy and 3rd party solutions
with Dynamics 365.
5.
What is the "Common Data Model" and what role does it
play with Dynamics 365?
The common data model is a cloud-resident
business database, built on years of experience with our enterprise customers.
It will come with hundreds of standard business entities spanning both business
process (Dynamics 365) and productivity (Office 365). The standardization and
consistency of schema enables partners to build innovative applications and to
automate business processes spanning the entire
business process spectrum with confidence that solutions can be easily deployed
and used across Microsoft’s entire customer base.
6.
Are all these business apps built on the Azure platform?
We are focused on bringing the vision and
value of Dynamics 365 to our customers. Microsoft Azure is the focal point from
which we will drive innovation in Dynamics 365 and we will continue to adopt
Azure capabilities as they are made available.
We will continue to leverage Office 365 and existing Apps outside of
Azure to deliver on the vision.
7.
Will Dynamics 365 be available on-premises?
No.
Dynamics 365 is a cloud service, so it will not be available as is, on
premise or in private clouds.
We will continue to innovate and support
Dynamics CRM, Dynamics AX, NAV, GP and SL solutions. We will also offer customers connectors if
they want to use a hybrid of on-premises and cloud solutions and a migration
path when they are ready to move to the cloud.
8.
What happens to the Dynamics AX, GP, NAV, SL and CRM brand/
products?
This is the evolution of our business apps.
New versions of Dynamics AX and Dynamics CRM will come together later this year
to create the Enterprise edition of Dynamics 365. The Business edition of
Dynamics 365 for Financials is based on Project Madeira, which is in public
preview in North America. In the months following general availability of
Dynamics 365, we plan to rapidly expand the number of countries where Dynamics
365 for Financials is available. Dynamics NAV, GP, SL continue to be enhanced,
supported and licensed to new customers for on-premises and private cloud
deployments.
9.
Does xRM provide the consistent app platform and a common data
model?
The technology referred to as xRM is the
current application platform technology that support our customer engagement (and
CRM) workloads. With the new Microsoft Common Data Model, we’ve taken extensive
learnings from xRM as well as other application platform technologies from our
Dynamics applications such as Dynamics AX and Dynamics NAV. Based on these
learnings we have developed a new data framework that is natively built on the
Azure platform services and provides a rich set of standard business entities
for our customers and partners.
10. Is xRM going away?
No,
the xRM technology is not going away. We will continue to invest in this
technology to support core extensibility scenarios required for our customer
engagement solution.
11. What does Dynamics
365 offer for Small and Midsize Businesses?
At launch, Dynamics 365 will include
Dynamics 365 Financials for Business, a comprehensive accounting and business
management solution for SMBs. That offering is currently in preview in the US
and Canada today under the name “Microsoft Project Madeira”. In the months
following general availability of Dynamics 365, we plan to rapidly expand the
number of countries where Dynamics 365 for Financials is available.
Furthermore, as announced during the US User Group Summit in October, 2016,
Microsoft plans to release additional applications such as Sales and Services
for the Business Edition during the Spring 2017.
12. What level of SLA will apply to Dynamics 365
particularly to Dynamics 365 Business Application for Operations? What is
Microsoft’s guaranteed uptime and does Microsoft Azure services credit policy
apply?
The service level agreements (SLAs)
for the current Dynamics online product can be found in
the Volume Licensing site.
We expect the SLAs for Dynamics 365 products to be consistent with these
agreements, but are subject to adjustment with the alignment of the services.
13. How do customers and partners access Dynamics 365 data for usage in
PowerApps and Microsoft Flow?
PowerApps
and Flow can connect to a wide variety of cloud data sources to create
composite business apps and workflows. Access your Dynamics 365 data for usage
in PowerApps and Flow through a common set of connectors. Connectors for
Dynamics 365 for Customer Services, Field Services, Sales, Project Services,
and Operations are available today.
14. What is the CRM/AX Product Roadmap for Common Data Model?
We
are not migrating any of the current workloads to the Common Data Model (CDM).
CDM is a key capability of PowerApps that will enable customers and
partners to build more powerful applications more quickly. In the future, we
will replicate data from Dynamics 365 directly in CDM to make it easier to
build Apps. We foresee that 3rd party ISVs can build a similar data
replication to represent their key data in CDM as well.
Sunday 13 November 2016
About Me
A seasoned ERP professional With Microsoft Dynamics ERP solution expertise
· Microsoft Certified Dynamics ERP (MBSS) Consultant.
· With 10+ End to End implementation in depth Techno functional Functional knowledge.
· Deft in handling end-to-end implementation & maintenance of Retail Solution/Business Solution.
· Good Domain Exposure to Retail, Supply chain management, Finance, Banking. Manufacturing etc
· Overall responsibility of the Microsoft Dynamics AX solution functionality and strategic planning
- Microsoft Dynamics AX Enterprise solution implementation.Functional responsibility.
-Defining, growing and managing the Program Management discipline in Microsoft Dynamics AX
-Strategic planning of future direction of the product with customer need.
-Scope management and execution oversight and Solution presentation and evangelism
-Facilitation of solution deals with key customers in pre-sales situations
-Microsoft Dynamics total execution Ownership of the User Assistance on implementation
-Integration and alignment with Microsoft Enterprise solution as a whole
-Stakeholder management, internally and externally
-Business Consultant and Solution specialist
-Process improvement & Strategic innovation
Dynamics AX POS Data Missing ,Step to Get it back to AX HQ from POS
Issue Description :
Dynamics AX POS Store transaction is Missing only for 2 days In AX HQ . all other Data are fine.
Data may be missed Pulling due Connectivity Loss or disaster at Store and many more reason
Issue Deep dive
The goal is to check if there is a way to retrieve transactions for this missing
specific day, data in HQ which is only available in POS
Solution :
1- Step to grab all available transactions from store DB (not
a specific day) which still helps in this situation, since AX HQ will re-apply
transactions with no duplicates if there are transactions already available,
below what you need to do
How
does Async Client know what records to upload during a P job?
·
In
the channel database the following table is checked for each table:
o SELECT ISNULL(MAX(FilterMax), 0)
FROM crt.TABLEREPLICATIONLOG WHERE TABLENAME='ax.RETAILTRANSACTIONSALESTRANS'
AND FILTERFIELDNAME = 'REPLICATIONCOUNTERFROMORIGIN'
This check is done with all the tables that is sent to
the HQ.
So
one thing you could do is to force the Channel Database into thinking that the
records haven’t been uploaded to Async Server. If that table was cleared out it
would “reset” the channel database and it would re-upload all records into a
new RPF file. This should be OK since any duplicate transactions would be
ignored by AX.
Follow
this steps:
1.
Stop
the AsyncClient in the StoreDB machine
2.
Make
a backup of the Channel Database
3.
Delete
the table content crt.TABLEREPLICATIONLOG
4.
Start
the Async Client service
5.
Run
the P-job
As
said before, it is important that you run through this steps first in a test
environment to prevent any possible side effect
Monday 9 November 2015
Windows Azure for Dynamics AX - Foundational Learning for AX7
Get ready for the next AX release and grow your knowledge of Azure. This Topic Page covers baseline learning content across several core Azure product areas: IaaS, Hybrid Cloud (incl StorSimple), Performance, Developer, and Active Directory.
Microsoft Azure Trust Center
The trusted cloud
Security and privacy are embedded into the development of Azure
Security: We work to keep your data safe
Privacy: You own and control your customer data
Transparency: You know how your data is stored and accessed, and how we help secure it
Compliance: We conform to global standards
Friday 6 November 2015
Dynamics AX -Intialization Checklist
Installing Dynamics AX is the first step of installation process. Follow the link to refresh the info about this process. After Dynamics AX is installed, it should be initialized. After the initialization, Dynamics AX should be populated with data (manually or by importing demo data). In this training lesson, we will go through Dynamics AX 2012 Initialization checklist. It is a common procedure for all versions of Dynamics AX. Let’s begin.
A license file is required to complete this lesson. If you have access to the Microsoft Partner or Customer sources, you can download the license file from here (the Demo Virtual Machine Licenses section). Microsoft has uploaded a new license file that expires on December 31, 2015.
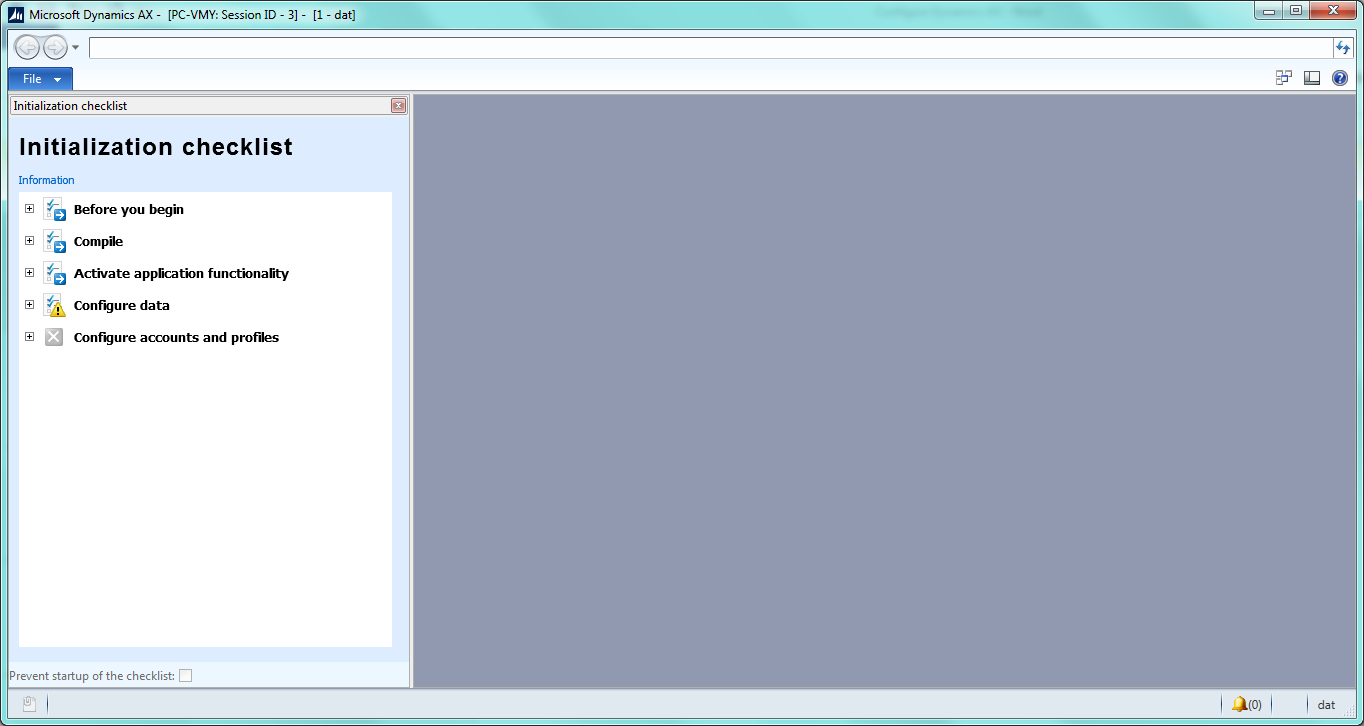
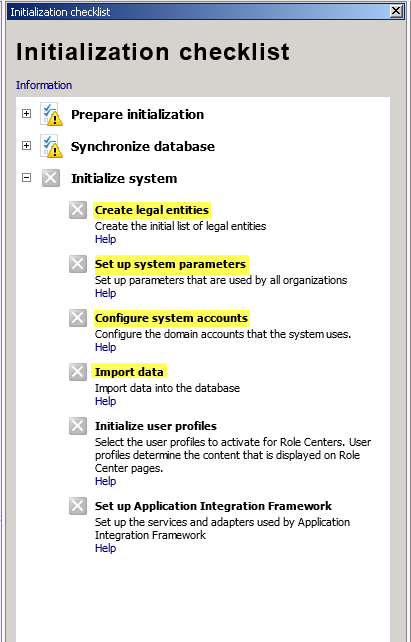
Initialization checklist
Make sure that the Microsoft Dynamics AX object service is running in Windows services. Launch the Dynamics AX client. The Dynamics AX client with the Initialization checklist opens.
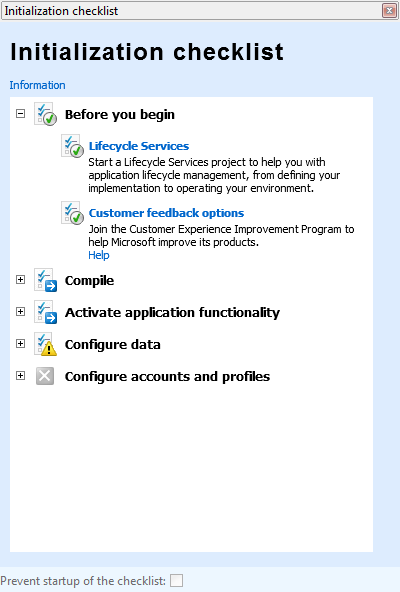
Before you begin
When you expand the Before you begin node, you see the Lifecycle services and Customer feedback menu items. Click the Lifecycle services menu item. As a result, the node is marked as completed and you are proposed to join the Microsoft Lifecycle service. The service is more applicable for project management. It is optional and up to you to use it.
The Customer feedback menu item is also optional. You can click the Mark as complete menu item.
When both menu items are marked as complete, the Before you begin node is also marked as complete.
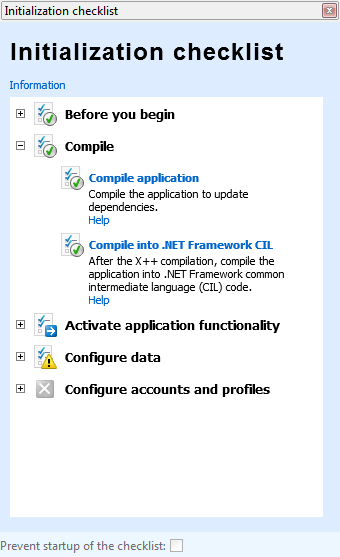
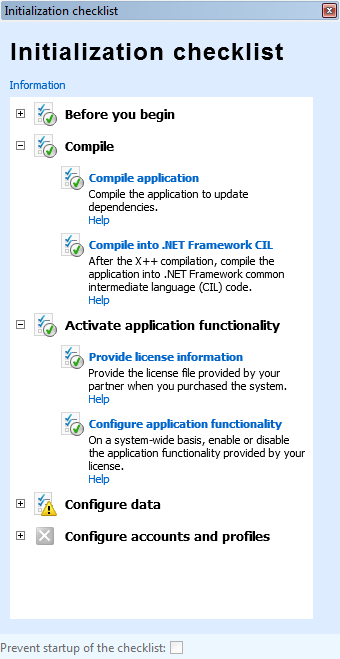
Compile
Open the Compile node. It contains two menu items: Compile application, Compile into .NET Framework CIL. Both steps are mandatory and by the way time consuming.
Click the Compile application menu item. You are prompted that it can take long time. Click Yes. The system starts compiling the application. On average it takes up to 6 hours.
When the compilation process is finished, the Compile application menu item is marked as complete.
Click the Compile into .Net Framework CIL menu item. You are prompted that it can take long time. Click Yes. The system starts compiling CIL. On average it takes up to 30 minutes.
When CIL is compiled, the infolog with the information about the started services is shown. Now both menu items and parent node are marked as complete.
Activate application functionality
Open the Activate application functionality node. It contains two menu items: Provide license information, Configure application functionality.
I have downloaded the Dynamics AX license file from the Partner source.
Click the Provide license information menu item. The License information form opens. Click the Load license filebutton, select the license file, and click OK.
As a result, the Infolog with the messages appears and the License information form looks as follows:
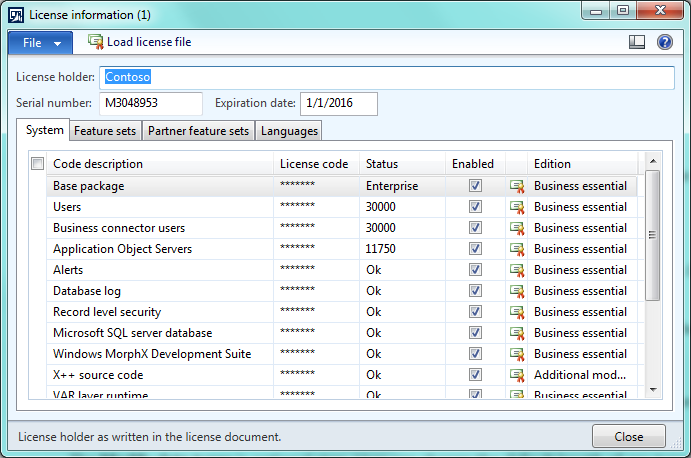
On the Feature sets tab, you can find all modules that are enabled.
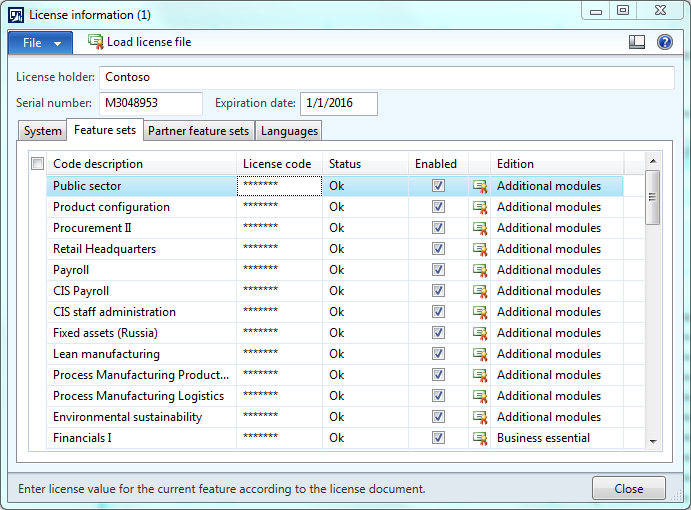
TIP: If you want to disable some module, the easiest way is to clear the License code field. (You can reload the license file at any time).
Click the Configure application functionality menu item. The License configuration form opens. You can enable or disable some module features but you cannot disable the entire module.
Usually it is required to have either all module features or none. Use the tip above for instructions.
Click OK. We have both menu items and the node marked as complete.
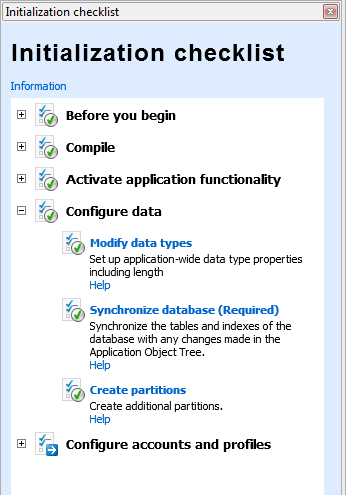
Configure data
Open the Configure data node. It contains three menu items: Modify data types, Synchronize database, Create partitions.
The Modify data types is an optional step. The user can change the default length of any data type. For example (from TechNet): To change the number of decimal values of the Amount data type, enter the number of decimal values you require in the Decimals field. If you change the number from 2 to 0, the amount that inherits from theAmount data type appears as 200 instead of 200.00. The change is reflected throughout the system where theAmount data type is used.
Each Dynamics AX table field should have a data type assigned.
Note that it is not about how this type is displayed rather how this type is stored in the SQL. So the TechNet explanation is a bit confusing.
For example the user specifies 20 decimals for the Amount data type. The customer transaction amount field uses the Amount data type. The customer transaction amount is saved in the SQL as 200.0000000000000000 (note there are no 20 decimals because the SQL maximum size of decimals is 16) and is shown to the User as 200.00.
Because the display format is set up in Windows:
- Control Panel\Clock, Language, and Region
- Change date, time or number format menu button
- Additional settings button
- of digits after decimal field
Click the Modify data types menu item. The Modify data types form opens.

Leave all values by default and click OK.
On the Synchronize database step, the system creates tables and views (CustTable, CustTrans, SalesTable etc) in the MicrosofDynamicsAX database from the metadata. For the DAX 2012R2 and above versions, the metadata is stored in the MicrosoftDynamicsAX_model database. For the lower DAX versions, metadata is stored in the same MicrosoftDynamicsAX database.
Click the Synchronize database menu item. The system starts synchronization. This is a time consuming process which usually takes up to 30 min.
Starting from DAX 2012 R2, the Create partitions menu item is added. For development, test, or education environments, it is enough to have one Initial partition that is created by default. Partition is a logical split of data. Data from different partitions is stored in the same database and tables use the same AOS instance. Each data contains information about its partition. Each user has access to one or many partitions.
Click the Create partitions menu item. The Partitions form opens. The form contains one default partition. Close the form.
As a result, we have all three menu items and the node marked as complete.
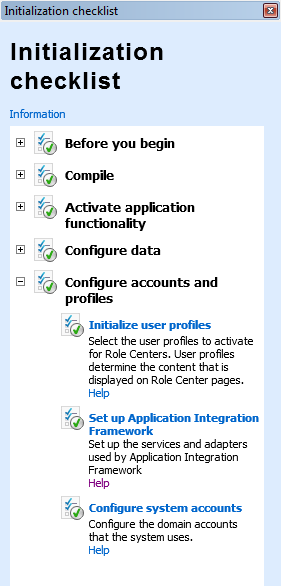
Configure accounts and profiles
Open the Configure accounts and profiles node. It contains three menu items: Initialize user profiles, Set up Application Integration Framework, Configure system accounts.
Click the Initialize user profiles menu item. The Initialize user profiles form opens.
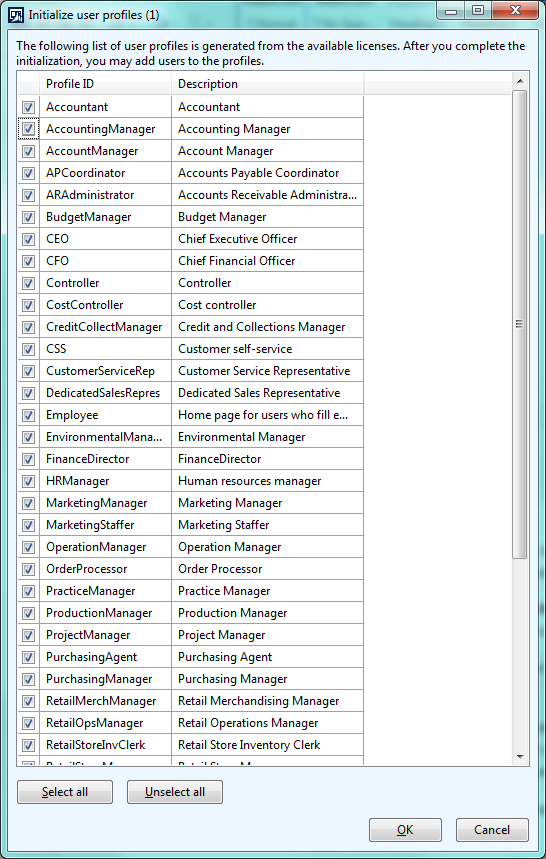
Dynamics AX suggests creating listed user profiles (user roles) in the system.
For development, test, education environments, the SYSADMIN user role is used. This role is hardcoded and always exists in Dynamics AX. The user with the SYSADMIN role has the maximum permissions in Dynamics AX.
For production environment, user profiles can be used to restrict access to some data. For example, a sales manager should only see his/her own sales orders and not the orders of another sales manager. Or a billing clerk has access to Invoices but doesn’t have access to the company revenue information.
In any case having suggested user profiles does not harm our Dynamics AX application. Click the Select all check box in the Initialize user profiles form and click OK.
Click the Set up Application Integration Framework menu item. The process takes about 20 minutes. During this time, some standard services are published to the AOS. Starting from DAX 2012, the WSDL services are hosted on the AOS.
For example, you can check that the BI service has been deployed:http://localhost:8102/DynamicsAx/Services/BIServices. Note that in my case, the 8102 port is used (by default it is 8101). The port is configurable in the Dynamics AX Client configuration (can be run from the Control panel).
The Application Integration Framework is used to exchange data in XML format. Third-party applications can request some data from Dynamics AX or send some data to Dynamics AX.
Note that in AIF data is transferred in XML format only. User cannot change the file structure.
AIF is not about the file format it is about data transfer. So, for example, if it is required to export data to the CSV format, AIF cannot be used.
Click the Configure system accounts menu item. The System service accounts form opens. It is required to specify the Business connector account.
Dynamics AX Business connector uses this account to log in to Dynamics AX. (So this user should have access to DAX).
Business connector is used by a third-party application to access the DAX data or run the DAX business logics. It is the .Net library with a set of classes that can be used in third-party applications.
By the way, Business connector is used by SSRS when Dynamics AX reports is run.
I specify my domain account as Business connector account.
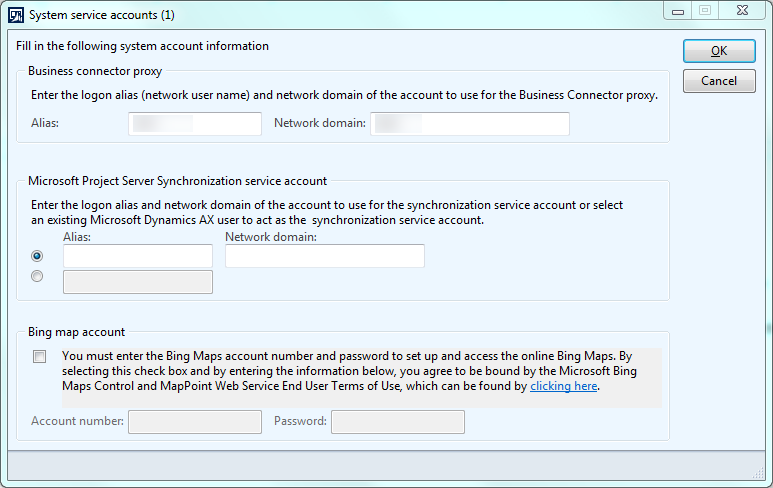
Click OK.
As a result, we have all three menu items and nodes marked as complete.
Partition initialization checklist
Starting from DAX 2012 R2, the Partitions are introduced and the new Partition initialization checklist is added.
Now Dynamics AX has the Companies and the Partitions. Both are a logical split of data. Data from different partitions and companies is stored in the same database and tables and use the same AOS instance.
A Company is a low level entity which contains one-company specific information (for example Sales orders). Some information is cross company for example Users, i.e. users are shared between all companies.
A Partition is a high level entity that has its own set of companies. Partition contains multiple-companies specific information plus cross company information. Cross company information from one partition is not accessible from another partition.
For development, test, or education environments, it is enough to have one Initial partition that is created by default.
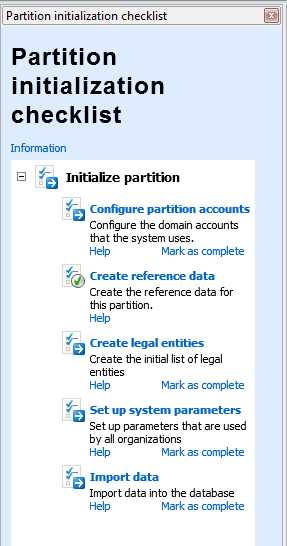
Let’s run Dynamics AX. After you complete the tasks in the Initialization checklist, the Partition initialization checklistopens automatically when you first start the Microsoft Dynamics AX client. You can also open the Partition initialization checklist by clicking System administration > Setup > Checklists > Partition initialization checklist.
The Partition initialization checklist has the following view:
Basically this checklist contains the same steps that were in the Initialization checklist of the previous version of Dynamics AX. You can check it here.
Click the Configure partition accounts menu item. The System service accounts form opens. You are asked to enter the Workflow execution account. It is an optional step. If you do not use the Workflow, you can leave this account empty. Otherwise fill it in. Click OK.
Click the Create reference data menu item. The job is run. As a result, all parameters tables are populated with default values (for example, the CustParameters table), and some default data is populated (for example the Currency and Language tables).
Click the Create legal entities menu item. The Legal entities form opens. The default company is already created in the previous step. It is the DAT company. In the next training lesson we will load demo data (with companies). ClickClose.
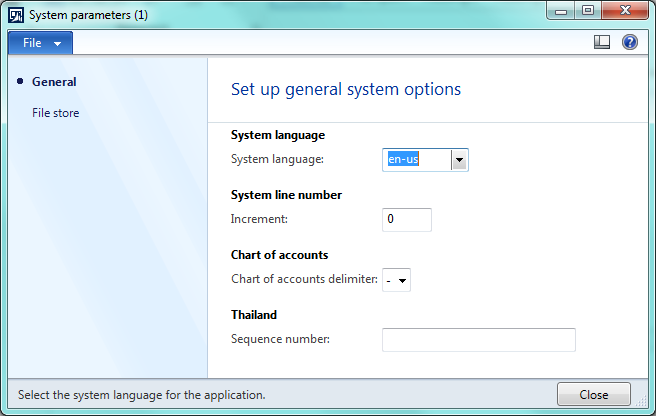
Click the Setup system parameters menu item. The System parameters form opens. Populate the System languagefield with the required language. Note that languages already exist in the Dynamics AX (they were populated on the Create reference data step). The rest parameters are optional. Close the form.
The “The Report data clean up job is added to the batch queue” message appears. This job runs recursively to clean up report data. The report data is collected and stored in special tables. When the report is printed, the collected report data can remain in the Dynamics AX tables. Since this data is no longer required, it can be cleaned up automatically. For this purposes this job is added to the batch queue. You can cancel this and any jobs from the batch queue later through the User interface: System administration > Inquiries > Batch jobs > Batch jobs.
Click the Import data menu item. The Import options form opens. Microsoft has not prepared the demo data in the DAT format for this version of Dynamics AX. We will import the demo data in the next training lesson. Close the form. Mark this step as complete.
Close the Dynamics AX and run again. The Microsoft Dynamics AX with all modules opens.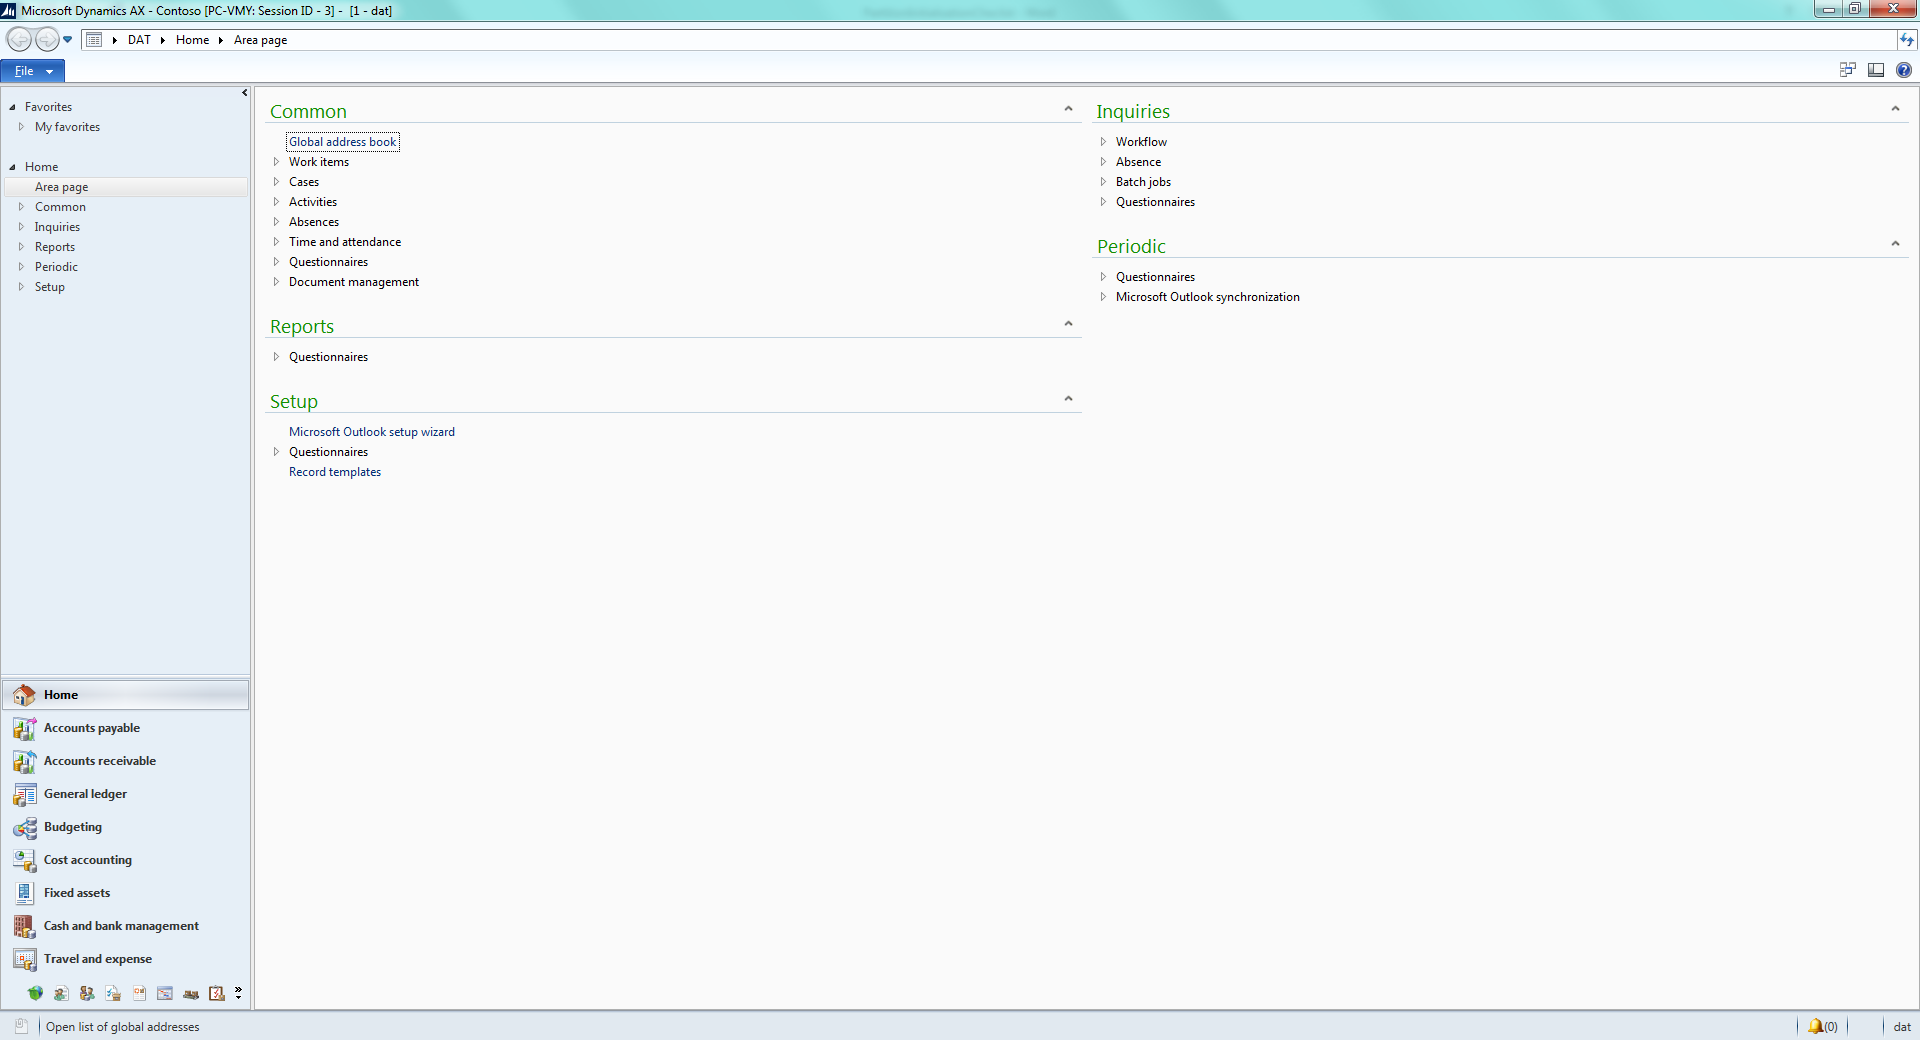
Dynamics Installation -AX server
Dynamics AX installation
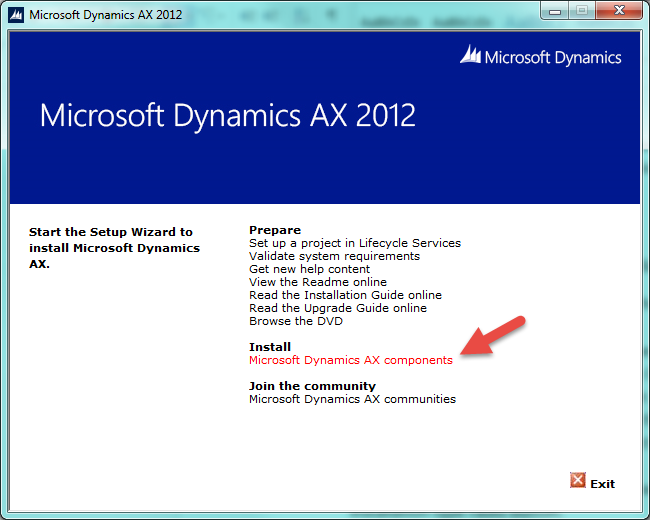
Now we can set up Dynamics AX. Find the Setup.exe file in your Dynamics AX installation folder and run it:
- The Microsoft Dynamics wizard opens. Click the Microsoft Dynamics AX components menu button.
- The Microsoft Dynamics AX Setup wizard with the Welcome page opens. Click Next to continue.
- The License terms page opens, select the I accept the license terms check box and click Next. (This page opens only if you run installation for the first time.)
- The Customer Experience Improvement Program page opens. Select what fits you and click Next. (This page opens only if you run installation for the first time.)
- The Select a file location page opens. I leave the default File location value (“C:\Program Files\Microsoft Dynamics AX\60”). Click Next. (This page opens only if you run installation for the first time.)
- The Ready to install page opens. Clicks the Install Setup will install the support files. (This page opens only if you run installation for the first time.)
- The Select an installation option page opens. Select the Microsoft Dynamics AX radio button and click Next.
- The Select installation type page opens. To see what will be installed, select the Custom installation typeradio button.
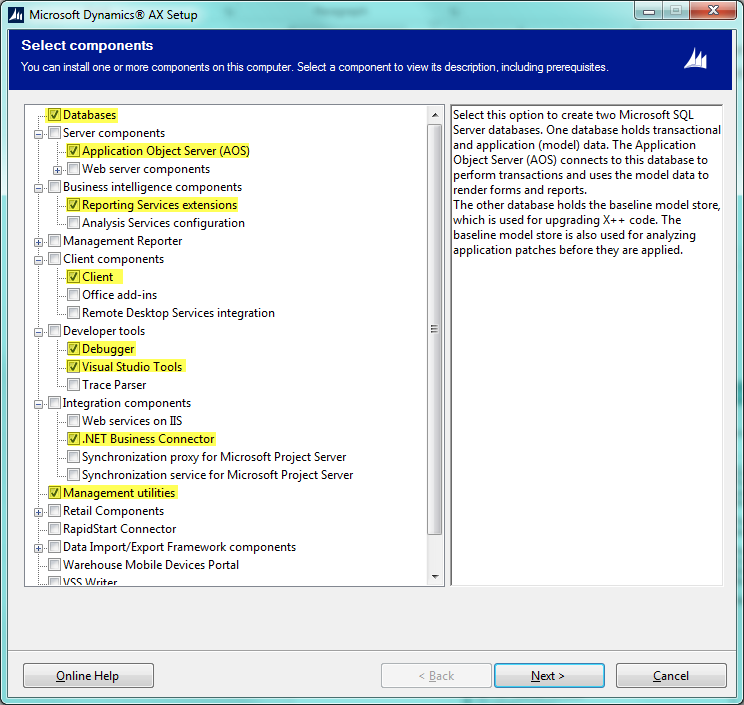
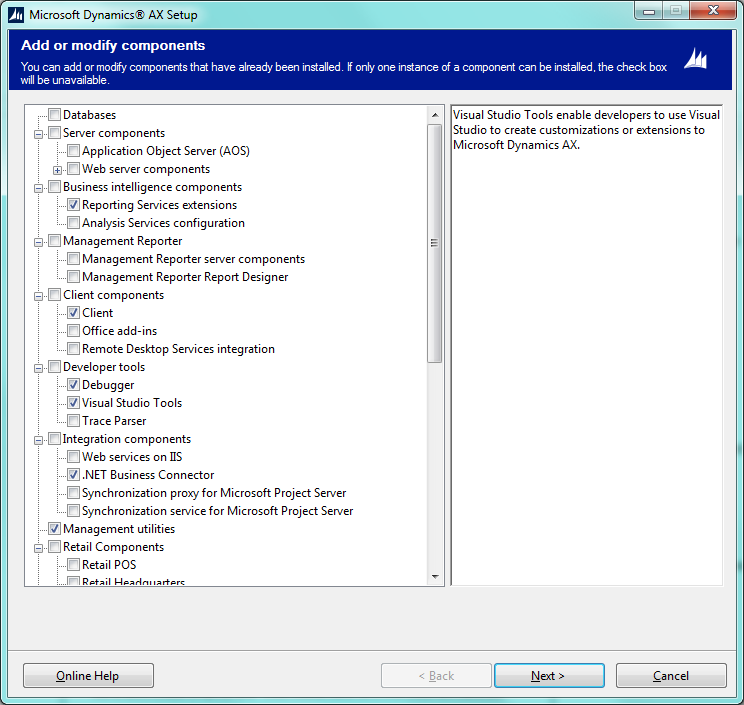
- The Select components window appears. Select the following components and click Next
- Database
- Application Object Server (AOS)
- Reporting Services extension (it is used for reports). Info window will appears click Ok.
- Client
- Debugger (for developers)
- Visual studio tools (for developer for SSRS report development)
- .Net Business Connector
- Management utilities
- The Prerequisite Validation page opens. I have 7 Errors.
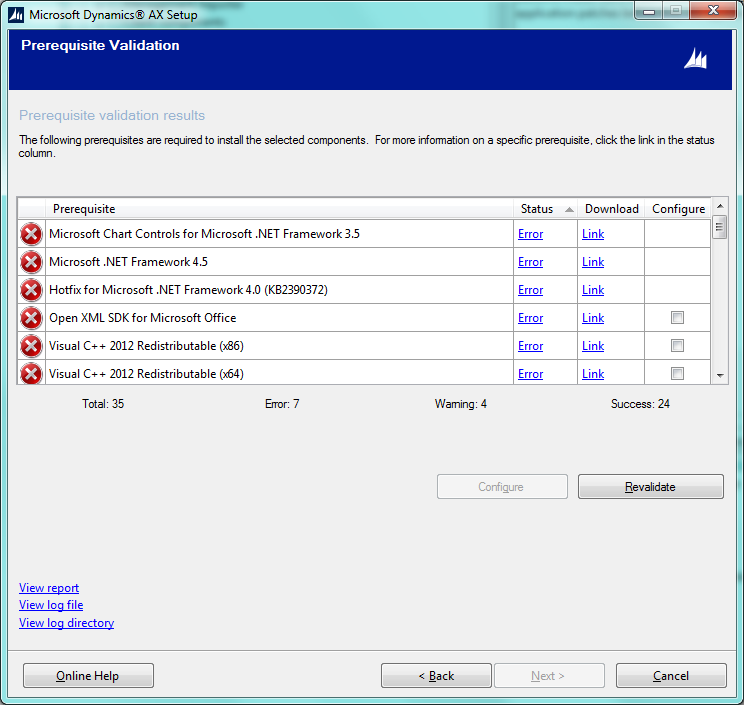
- I have resolved all errors by clicking the Link button and installing all required components. Click Next.
- The Select a file location page opens. I leave the default File location value (“C:\Program Files\Microsoft Dynamics AX\60”). Click Next.
- The Select databases page opens. Select the Create new databases radio button and click Next.
- The Create new databases page opens. The Server name contains the SQL server name (was installed in the previous topic). All fields will be populated automatically, so I leave it as is. Click Next.
- The Select additional models page opens. The Foundation model is mandatory and selected. This model contains all metadata and the en-us label file (English United states). If you need additional language, select the Foundation Labels model. In this case all available languages are set up. Click Next.
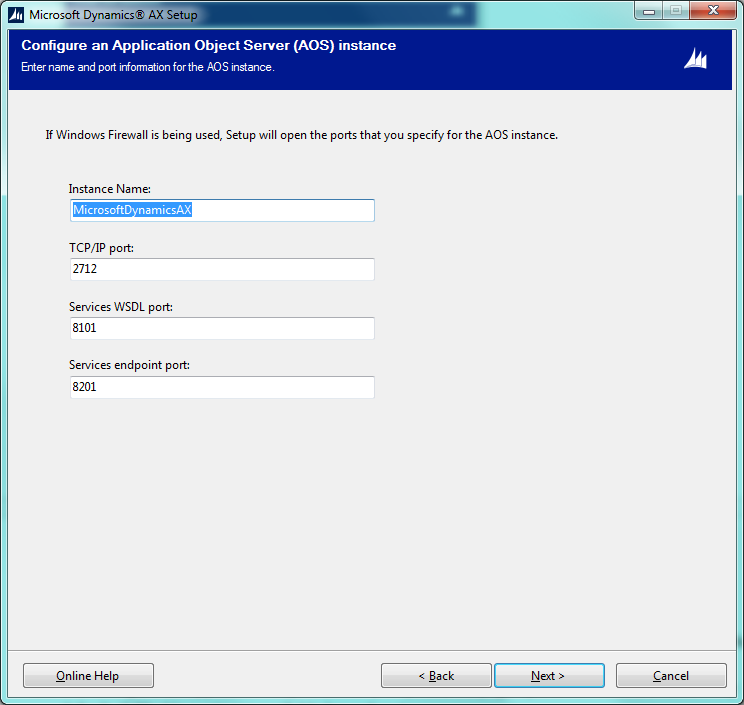
- The Configure an Application Object Server (AOS) instance page opens. All fields are filled in by default. If the fields’ values are acceptable to you leave them as they are. The TCP/Ip port can be changed later in the Dynamics AX Server configuration. Click Next.
- The Specify an AOS account page opens. You can specify your domain account or use the NT Authority local account for AOS. AOS will be installed as a Windows Service. As it often happens in production environment, the new domain user is created and assigned to the AOS. The AOS account can be changed later in the Windows Services. I will specify my domain account as it has all necessary rights and click Next.
- The Select client preference page opens. Here the Dynamics AX Client language is specified. I have set up the English language, the Developer installation type. Now select the Create a desktop shortcut checkbox, and click Next.
- The Specify Business Connector proxy account information page opens. Specify the domain user that will be used by the .Net Business connector to log in to Dynamics AX. Business connector is used by the SSRS reports. I will set up my domain account and click Next.
- The Specify a Reporting Services Instance page opens. The Instance name field will be filled in by default. I clear the Deploy report checkbox. I want to check the Dynamics AX report configuration before deploying reports. All in all I will deploy reports to SSRS later in the Load demo data lesson. Click Next.
- The Prerequisite validation page opens. I have one error – Microsoft Analysis Management Objects. This error is solved by clicking the Link Click Next.
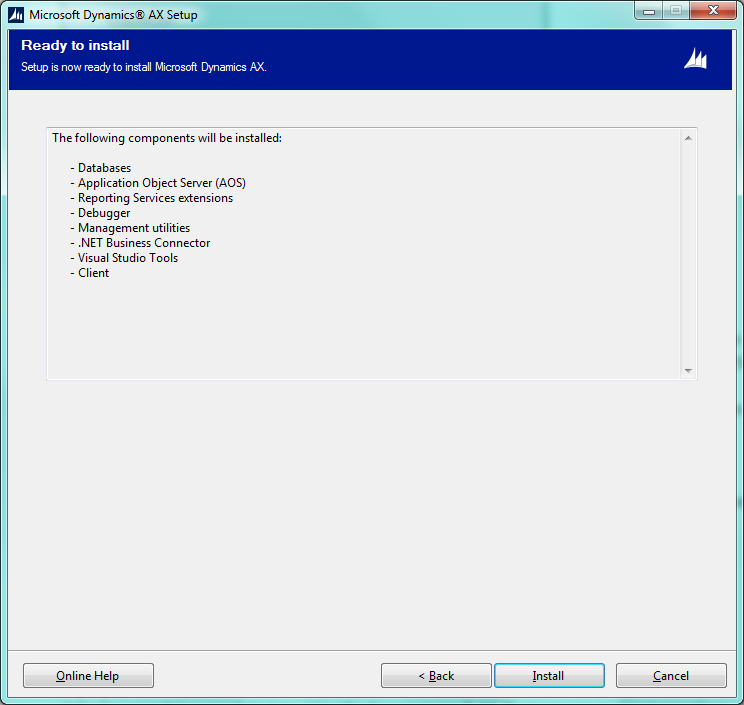
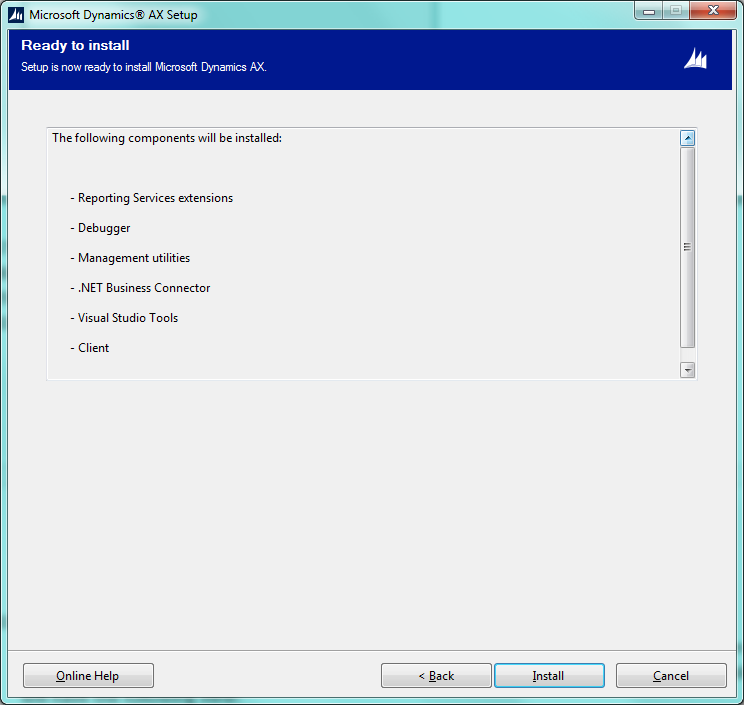
- The Ready to install page opens. Click Install. This process will take about 1 hour.
- When the process is complete, the Setup was not completed page opens.
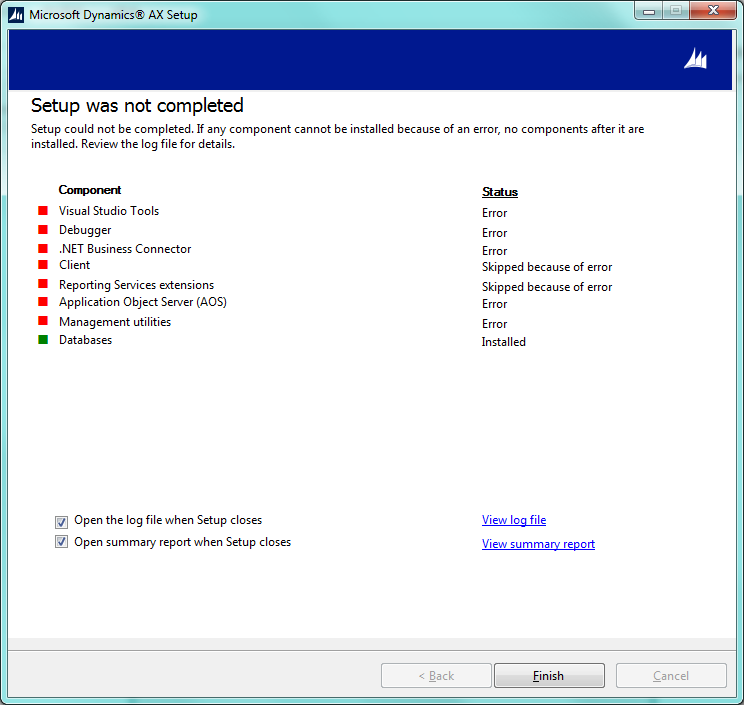 We can see that Databases were installed successfully and the rest of components were not installed. But, it is not true, if we go to Windows Services, we can find the Microsoft Dynamics AX Object Server service in the Startingstatus. It means that AOS was installed.If we open the summary report, we can find that the wizard assumes that AOS was not installed because “The following error/warning occurred: Time out has expired and the operation has not been completed.”So AOS was installed but not yet started. The rest of components that depend on AOS were not installed also.
 - Finish the Microsoft Dynamics Wizard and wait one more hour till AOS is started.
- Run the Microsoft Dynamics Wizard
- The Welcome page opens. Click Next.
- The Modify Microsoft Dynamics AX installation page opens. Select Add or modify components and click Next.
- The Add or modify components page opens. Select the following components: Reporting Services extension, Client, Debugger, Visual studio tools, .Net Business Connector, Management utilities and click Next.
- The Prerequisite Validation page opens. Since we have already installed all required components, there are no errors. Click Next.
- The Select client preference page opens. Here, the Dynamics AX Client language is specified. I have set up the English language, Developer installation type. Select the Create a desktop shortcut check box and clickNext.
- The Specify a location for configuration settings page opens. Select the Save configuration in the registryradio button. If a configuration file will be required, later we can generate it from the Microsoft Dynamics AX Configuration application (it will be available in the Windows Administrative Tools). Click Next
- The Connect to an AOS instance page opens. Specify the connection parameters that will be used by the Client. I leave the default ones as they fit me. The parameters should match the AOS parameters that were specified in step 16. Note that on this step, the AOS should run (to review the service status go to Windows Services > Microsoft Dynamics AX Object Server).
- The Specify Business Connector proxy account information page opens. Specify the domain user that will be used by the .Net Business connector to log in to Dynamics AX. The Business connector is used by the SSRS reports. I will set up my domain account and click Next.
- The Specify a Reporting Services Instance page opens. The Instance name field will be filled in by default. Again I clear the Deploy report checkbox. I want to check the Dynamics AX report configuration before deploying reports. All in all I will deploy reports to SSRS later in the Load demo data lesson. Click Next.
- The Connect to a SQL Server Database page opens. Here we should specify the SQL server and the database name where the Dynamics AX database was installed. In my case, it is:
- The Prerequisite validation page opens. We already were at this step so now we don’t have any validation errors. Click Next.
- The Ready to install page opens. Click Install. This process will take about 0.5 hour.
- When the setup is complete, the Setup was completed successfully page opens. Click Finish.
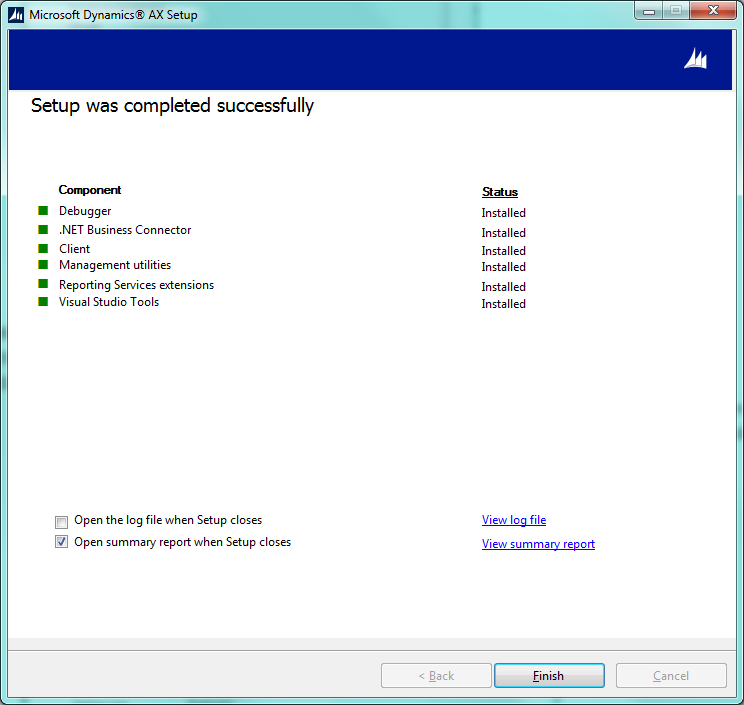
Congratulations! The Dynamics AX 2012 was installed successfully.
Subscribe to:
Posts (Atom)